
How to Create a Main Menu in Unreal Engine 5: Complete Guide
One essential aspect of any game is a well-designed main menu that serves as the gateway to your immersive virtual world. In this tutorial, we will walk you through the process of creating a main menu in Unreal Engine

Today, we're diving into one of the fundamental aspects of game development: creating a main menu.
Whether you're a seasoned developer or just starting out, understanding how to craft an intuitive and visually appealing main menu is crucial for engaging players right from the start.
In this guide, we'll walk you through the process step by step, empowering you to design a main menu that not only looks great but also enhances the overall user experience of your game.
I also made a video tutorial about this subject if you prefer to watch instead of read.
Table Of Contents
- Setting Up Your Project
- Creating a Widget Blueprint
- Designing Your Main Menu
- Functionality to Your Main Menu
- Testing Your Main Menu
- Conclusion
Setting Up Your Project
Before proceeding with the creation of a main menu in Unreal Engine, it is essential to first set up your project. Here is a step-by-step guide to help you navigate through the process:
1. Launch the Epic Games Launcher application. On the left-hand side of the interface, locate and select the Unreal Engine tab. Within the Unreal Engine tab, click on the Launch UE5 button to initiate the Project Browser.

2. Select The Games category.

Note
You can explore alternative development categories that best align with your project objectives.
3. A window will appear with various project templates. Select a Third Person template.
4. Enter a unique name for your project in the Project Name field. Additionally choose a location where you want to save the project.

5. Finally, click on the Create button to initiate the project creation process.
Creating a Widget Blueprint
Once your project is set up, you can start creating your main menu. Here are the steps to create a Widget Blueprint:
1. In the Unreal Engine Editor, locate and click on the Content Browser panel, typically found on the left side of the interface. Right-click inside the Content Browser or click the Add button.

2. In the Add New menu, a dropdown menu will appear. From the dropdown menu, select User Interface to access UI-related options for creating your main menu.

3. After selecting User Interface, a list of options will be presented. Look for and click on Widget Blueprint to create a Widget Blueprint

4. In the Widget Blueprint creation window, you will see two options: User Widget and All Classes. Click on the User Widget.

5. A dialog box will appear, prompting you to name your newly created Widget Blueprint. Enter a descriptive name for your main menu Widget Blueprint, allowing you to easily identify it in your project.

6. In the Content Browser, locate the Widget Blueprint you just created and double-click on it. This action will open the Widget Blueprint in the Blueprint Editor, where you can design and define the functionality of your main menu.

Inside the Blueprint Editor, you can start designing your main menu by utilizing the widgets available in the Palette. The Palette contains various UI elements such as buttons, text boxes, images, and more. Additionally, you can define interactions, implement logic, and customize the appearance of each widget using the Blueprint visual scripting system.

Here are explanations of different panels:
- Palette: Refers to a graphical interface element that allows designers to easily select and place predefined user interface components for creating interactive and visually appealing interfaces.
- MainWidget: Serves as the primary container or base for creating user interfaces within a game or application. It acts as a parent widget that encapsulates and manages other child widgets, such as buttons, text boxes, images, and more.
- Visual Designer: The Visual Designer provides a visual canvas where you can create and edit the layout of your UI widget. It allows you to arrange and position various UI elements, such as buttons, text boxes, images, and more, by dragging and dropping them onto the canvas.
- Detail Panel: The Details Panel displays the properties and details of the selected node in the graph. It allows you to modify various settings and configurations of the selected node, such as its position, size, appearance, and behaviour.
Designing Your Main Menu
Designing the main menu in Unreal Engine is an important aspect of creating a game. To make your main menu visually appealing and functional, consider the following tips:
Choose a captivating background image or video that matches the theme of your game.
This will immediately capture players' attention and immerse them in the game's atmosphere. You can use dynamic backgrounds or even interactive elements to make it more engaging.
To add an image to the Widget Blueprint in Unreal Engine, you can follow a few simple steps:
1. Ensure that you have a Widget Blueprint open. In the Widget Blueprint editor, navigate to the Palette panel located on the left side of the screen. Within the Palette, find the Canvas Panel widget and drag and drop it onto the MainWidget.

2. After that find the Image widget drag and drop it onto the Canvas Panel.
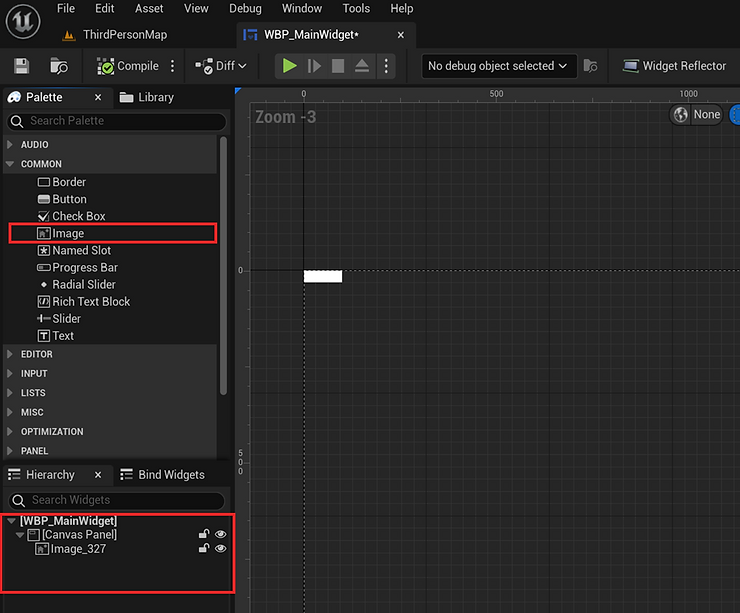
3. Once the Image widget is placed on the Canvas, you can customize it by selecting it. In the Details panel on the right side of the editor, locate the Image category. Here, you can set the desired image to be displayed. To do this, click on the image thumbnail and choose the desired image asset from your project's content browser.

4. Adding a button to the user interface in Unreal Engine is a straightforward process. Within the Palette, find the Button widget and either drag and drop it onto the Canvas.

5. To rename a button Right-click on the button widget and select Rename from the context menu. Enter the desired new name for the button and press Enter to confirm the change.

6. Once the button is placed on the Canvas, you can customize it to fit your desired appearance and functionality. In the Details panel on the right side of the editor, you will find various properties to modify. For instance, you can change the button's text by editing the Button Text property. You can also adjust the size, color, font, and alignment of the text using the available options.
7. You can add a Text inside a Button widget to display text on the button. Drag and drop the Text widget onto the Button widget on the canvas. This places the Text widget inside the Button widget.

8. Similarly, you can add other buttons onto the canvas panel.

9. By following these steps, you can easily incorporate a button into your Unreal Engine widget blueprint, providing users with a visual element that they can interact with to perform various actions within your application or game.
10. Text is added to the widget in Unreal Engine to provide information, instructions, labels, or any form of textual content that enhances the user experience and provides necessary context within the application or game.
11. Adding text to the user interface in Unreal Engine is a simple process. In the Widget Blueprint editor, navigate to the Palette panel on the left side of the screen. Locate the Text widget and either drag and drop it onto the canvas or click on it to place it manually.

12. Once the text widget is placed on the canvas, you can customize it to display the desired text. In the Details panel on the right side of the editor, you will find various properties to modify. Look for the Text property and enter the desired text content directly or bind it to a variable to dynamically update the text during runtime.
Functionality to Your Main Menu
After you have finished the process of designing your main menu, it is essential to enhance its usability by adding functionality. This involves implementing interactive features and actions that allow users to navigate, interact, and perform various tasks within the menu.
To add functionality to the Main Menu, follow these steps:
1. Select the Play button on the canvas in the Widget Blueprint Editor. In the Details Panel, locate the On Clicked event for the Play button. Click on the + icon next to the On Clicked event to add a new node.

2. This will open the Blueprint Graph, where you can visually create the functionality for the button. In the Blueprint Graph, you will see the event node representing the Play button's On Clicked event.
This node acts as the starting point for adding functionality. To add functionality, you can right-click in the graph to open the context menu. From the menu, you can search for specific actions or functions to incorporate into the button's behaviour.
( Note : if your using Unreal Engine 5.1 and above use "Open level by object reference" instead of "Open level by name" otherwise it won't work )

3. Repeat the same steps for the Resume and Quit buttons, adding functionality to their respective On Clicked events in the Blueprint Graph.
For the Options button, you can add nodes and logic to handle the button click event. For example, you can create a Create Widget node to instantiate another widget that represents your options menu.

4. For the Quit button, incorporate functionality that gracefully exits the game. This may include saving any necessary data or settings before closing the application.

5. To dynamically display the current time in your main menu, you can bind the text element to a variable that updates with the current time. In the Details Panel, locate the Text property and click the small Bind button next to it after that click on create binding button.

6. This will open the Blueprint Graph, where you can bind the text to the system time.

Testing Your Main Menu
After successfully implementing the desired functionality for your main menu, it is crucial to thoroughly test its performance and functionality. To initiate the testing process, you need to add the main menu widget to the view.
1. Open the Level Blueprint graph in new level other than ThirdPersonMap

2. Right-click on an empty area of the graph and type Create Widget in the search bar.
3. From the list of available nodes, select Create Widget and drag it onto the graph.
4. Connect the output execution pin of the Create Widget node to a Add to Viewport node.
This node is responsible for adding the widget to the game's viewport.
5. From the Create Widget node, select the desired widget class to create an instance of it. You can find the widget class by clicking on the drop-down menu and selecting it from the available options.
6. Then right-click again and look for the get player controller node.
Drag of this node and look for set player controller and make its checked, this will ensure the mouse cursor is visible when the menu appears
Drag of the get player controller node again and look for set input mode UI only this will ensure that the mouse cursor stays visible on the screen.
7. After connecting the nodes, compile and save your Blueprint.

8. Next go the level where your player will go to after clicking the play button on the main menu and add the below nodes to the level blueprint.

9. This will ensure that when the player starts the game, they can't see the mouse cursor and have full control of the player character.
10. Go back to the level where you set up the main menu and do the following :
- Go to window.
- From here select world settings.
- This will bring up a new tab for the world settings.
- In the world settings tap change the default pawn class to be the default pawn by default this will be whatever game mode you have selected by changing it to the default pawn we ensure that we don't spawn in an additional character.
- e.g. If you where in the third person template and you did not change this, it would spawn in a third person character when we open the main menu level.

11. Now finally Launch your game in the Unreal Editor's by clicking on the Play button

12. Interact with the buttons. Verify that the expected functionality is working correctly. If needed, make adjustments or iterate on your design to enhance the user experience.

Summary
Creating an engaging main menu is a vital part of game development, and Unreal Engine provides a robust set of tools to help you achieve this. By following the steps outlined in this tutorial, you can design and implement a captivating main menu for your Unreal Engine game. Remember to iterate and test your main menu thoroughly to ensure a smooth and enjoyable experience for your players. Good luck with your game development journey!
To get notified of upcoming posts on Unreal Engine, I invite you to subscribe to our newsletter:

And if you are just getting started learning Unreal Engine, have a look at the Unreal Engine for Beginners Course :